Friday, March 30, 2012

Bathroom #2

We have finished the half bath under the back stairs.  I didn't originally intend on making this bathroom a priority or even putting it anywhere on the list until the upstairs floor was laid and the kids were actually living in their rooms, but this room just worked itself into the plans and now it's done.  In hindsight, it should have been on the list as a priority anyway because we use it constantly.  I really expected that it wouldn't get much use since we have two other bathrooms on the bottom floor.  Not the case.  It's closest to the back door and closest to the kitchen, so it is pretty handy after all...

Here is the bathroom when we got the house. 
The bathroom is a bit odd shaped withe the toilet being in a little cubby behind the door.  I had intended on finding a dresser or hutch and putting a sink in it to serve as the vanity.  I came across one already done in a local store.  Nothing but luck on that one - the dresser was exactly what I had in mind and it fit like a glove in this space.  I actually found it before we bought the house and had no idea where it would end up, but I knew I could find a place for it.  So I bought it and saved it.  It was exactly the width of the old vanity in this bathroom, which is probably what led us to go ahead and do this bathroom.  We only needed to buy a toilet.

Here's the room now.
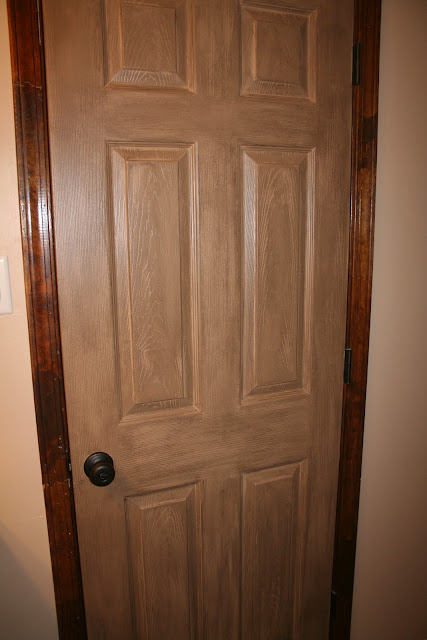
I also have painted all of the doors on the bottom floor with an antique finish.  That project has taken me weeks to finish, a little at a time.  Each door took 3 coats - two of a tan base coat and one of antiquing glaze.  Here's better view of the door.
So what do you think?  I like how it turned out. 


Only 3 bathrooms to go...

Thursday, March 29, 2012

Shutters and Candle Holders

I found some old shutters at the junk store and bought them for $3 each, having no idea what I would do with them.  I came across some pretty awesome candleholders at the antique store and the plan hit me.  I needed something to flank the tv in the den and I needed two of the same. 
 Plain ugly dirty $3 shutters...and below you can see why I needed something on this boring blank wall.
I painted the shutters with brown, one coat, kind of thrown on so some spots were missed to give it a vintage antiqued look.  And then I sanded some of the paint off of them to distress them a little further.  This was literally a five minute paint job.  But I liked the end result so I stopped there. 

I hung the shutters on either side of the tv and then hung the candle holders on top.


I need to come up with something to go above the tv, but for now, this is much better...
Not bad for a few bucks, eh? 

Sunday, March 25, 2012

The Fireplace

We got the den ceiling scraped and painted a pale blue.  We hung the new fan.  We ripped out the nasty carpet and laid new hardwood floor.  Now, the fireplace.  Here was the den when we got the house.
 I sold the fireplace mantle on craigslist the first week after we closed.  I had big plans for the fireplace but it took us a while to finally get to it on the list.  Here's what it looked like two weeks ago.
Pretty ugly.  I picked out some pretty awesome travertine mosaic tiles at Lowe's to cover the red brick.  I wanted the tile to have a natural look, with holes and rough edges.  This tile was perfect.
We got the tile on, got it grouted, and got several coats of sealer on it to give it a little sheen.  And then we put up my favorite part - the mantle.  It is a cedar log that has been drying for 5 years.  It was planed and sanded and hung up to make my fireplace lovely.  And here is the finished fireplace...

It totally changes the look of the room.  The room feels homier now, lived in. 


This room is starting to come together and it's exciting!  The furniture will go upstairs in the game room once we get it ready and I will get new furniture for this room.  Can't wait for that.  I still need to paint the French doors leading to the back yard on the other wall adjacent to the fireplace, but all other cosmetic changes to this room are complete.  It feels good.

The before again.

And after.
  What do you think?

Friday, March 16, 2012

Kitchen Twig Chandelier

I wanted to do something different for the chandelier above the kitchen table.  I found a picture online last year of a chandelier covered in twigs and loved it.  At that point in time, we were still just stalking this house and didn't know if we would get it.  I kept it in mind and planned to recreate what I saw in that picture if we ever got here. 

I bought a basic six light oil rubbed bronze chandelier on Black Friday.  It sat in the box until yesterday when my husband told me to move the kitchen chandelier project to the top of the priority list because using a lamp from the den in the kitchen every night for lighting was getting old.
 I took a basic grapevine wreath and cut it up.  I set up a makeshift stand with a board and some sawhorses, tied the chandelier up, and went to town wiring the branches/twigs/vines on to it. 
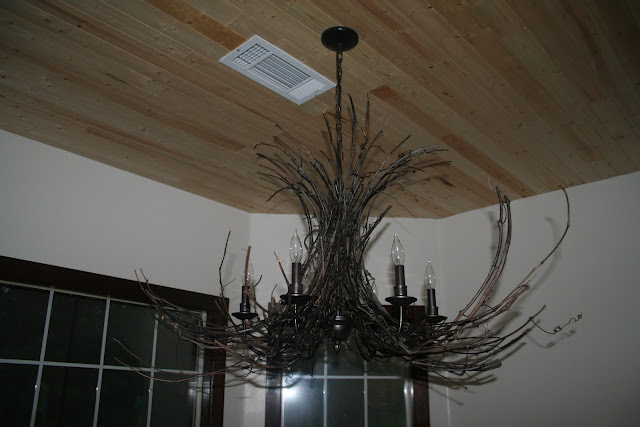
After a couple of hours, I decided I was pleased with the layout of the vines. I used pretty much the whole wreath.  I had just a few leftover scraps that didn't make it on the chandelier.  I used floral wire to attach the vines and unfortunately the only floral wire I had on hand was green.  I didn't want the green wire to be visible, so once it was all done, I spray painted the whole thing with oil rubbed bronze spray paint.  The paint disguised the green wire and made the chandelier sort of disappear in the twigs.  I like it.
  Here it is finished and hanging above the table.  (Please disregard the windows with no blinds or curtains - I am getting to it...still a million things on my list...)

One more project down...what do you think?

Wednesday, March 14, 2012

Bathroom #1

This house has a total of five bathrooms, three full and two half baths.  As with everything else, we are gutting them one by one and rebuilding to our liking.  There are two staircases in the house, one by the front door and one at the back of the house close to the back door by the garage (the dual staircases are another reason I loved about the layout of the house).  There is a half bath situated under each of these two staircases, which is perfect - one for guests by the den and the other by the back door for when the kids come in from the pool to use the bathroom. 

We have completed the remodel of two of the five baths and are working on the third now.  The first one completed was the half bath under the front staircase.  When we got the house, this bathroom had been stripped of everything except the DISGUSTING toilet and a really ugly cheap light fixture.  I won't gross you out with a picture of the old toilet :).  You're welcome.
We added wainscoting, a pedestal sink I scored on craigslist for $60 (still new in the box!), a new toilet and a better light fixture.  Here it is now, all fresh, clean, and new:
The mirror was a leftover from the old house.  It was silver, so I spray painted it with oil rubbed bronze paint.  A cheap and quick fix.  And it was just the right size. 


I haven't hung anything on the wall or done any of the decorating in there - the fun part - but most of my stuff is still in boxes and I want to wait until I have completed more rooms and can decide where I want everything to go before throwing something up in there. 

One room down!

Saturday, March 10, 2012

The Kitchen Ceiling

One of the first big noticeable issues we found with the new house was that the floor upstairs above the kitchen sloped down, which also made a sag in the kitchen ceiling.  We knew we needed to do something about it before we laid the new hardwood upstairs.  Apparently the kitchen ceiling/upstairs floor needed an additional support beam.  So the men got to work...

Here is the kitchen when we bought it.

And here are Danny and his friend Don fixing the problem.  Don is awesome and everyone should have a friend like him!


We scraped the popcorn ceiling off of every room in the house before we startd painting, but the kitchen ceiling needed something more than scraping because we now had two patched pieces in the middle of the room.  The solution was laying wood on the ceiling. 

I still don't have the light fixture above the kitchen table area but I am doing a little special project to it before we hang it.  I've also painted the cabinets and we've replaced all of the appliances.  I'll save those for other blog posts though :).

We removed the 1980's fluorescent light from the middle of the kitchen and replaced with canned lights over the stove and oven areas.  I like it much better.  I really like the rustic look of the wood and so we decided to leave it natural instead of painting or staining.  It contributes to my vintage farmhouse theme.

Thanks for stopping by!


Light Fixture Remodel

The previous owners of our new house left this gem of a fixture laying in the dining room floor.  I have no idea why they disconnected it and then just left it in the floor...
Ugly as it was, I couldn't just throw it away.  With some cleaning and a can of spray paint, a new revived light fixture has emerged and now adorns the laundry room. 

Much better and only cost about $5.  What do you think?

Tuesday, March 6, 2012

The New House

It's been a long time since I wrote on the blog.  We got a whim last summer and decided to put our house on the market.  We had a sign in the yard for 5 days and then, bam, house was sold.  Of course, we had not planned on it selling that quickly, so we had not found a new house.  So we packed up and moved in with the family until we could find a place to live.  I had no projects going on so nothing to write about...that has changed and I am ready to blog!

We found a house we loved, a fixer-upper, which are my favorite kind.  It was not listed for sale but we could tell it had been empty for a while.  We had our agent call around and we found out the owners were trying to negotiate with the banks to agree to a short sale.  We waited and waited and almost bid on another house.  And then, as I browsed on realtor.com, there it was!  The bank had agreed to a short sale.  We put a bid in that very next day.

I don't know if you all know how short sales work, but GEEZ, BE PREPARED TO WAIT.  We waited for over two months before we heard that the bank was considering our offer.  We waited some more, and then some more.  We finally got the word that we had won the house and were closing in a couple of weeks. 

We hit a few more hiccups with the land survey and then the tax payment from the prior year and blah, blah, blah.  Closing was delayed a couple more weeks and at one point, I thought we for sure were just not going to get this house. 

And then we closed.  I was elated.  We came over to the house and sat and just stared.  We had wanted to move out into the country.  We wanted land.  We wanted to not be in a subdivision.  We wanted a pool.  We wanted a guest room.  We wanted big closets.  I wanted an office.  A lot of wants, right?  This house had everything on our wish list.  But it was really ugly.  It hadn't been lived in in almost two years.  So the pool was/still is green.  With frogs and such.  (We will have that all worked out and back to blue waters by bathing suit weather...)  The carpets were disgusting and smelle dof dog pee.  The bathrooms were just gross.  It was all bad.  But it has potential.  It has a great floor plan and it is well built.  It just needed some love. 

We have so many projects to do to get this house to what I envision it looking like, we will be working on it for years.  But I don't care.  We have forever, right?  I am taking it one step at a time, one project at a time.  

Here is the house when we found it and started stalking it. 

That yard needed some serious TLC.  My dad showed up with a crew and a backhoe within about 48 hours of us signing the papers.  So far, we have gotten a good start on the landscaping (Thanks Dad!).  Here is what it looks like now:

I still have big plans for the outside.  I need to replace the light fixtures at the front door, paint the front door, get some cute porch and gazebo furniture, maybe paint the shutters....all in due time.

Join me on my journey to redo each and every thing in this house.  I have lots of ideas and projects running through my head...now time to execute!