Saturday, October 27, 2012

The Kitchen Sink

So here is another post showing how a little change can make a huge difference...the kitchen sink. The sink in this house was dreadful (almost as bad as the mailbox!).

We have been back and forth on what kind to get - another stainless steel one, a cast iron one, a granite composite one?    And so we have put it off for a long time until we could come to an agreement...

We ended up going with the granite.  It was a little pricier (ok, a lot pricier) but I loved the fact that it was cafe brown and would tie in with the oil rubbed bronze hardware.  We could also get it with SUPER deep bowls and that sealed the deal.  We got the faucet with the pull out sprayer.
Here it is...
See how deep the bowls are!?!?!  It's awesome!

Getting this new sink has been life-changing.  I didn't realize quite how bad the other one was until I experienced the new one.  I still am not enjoying doing the dishes though...

The Mailbox

It's been a while since I've posted any house projects, but I promise that doesn't mean we haven't been working on stuff. We've been doing those things that aren't worthy of writing about - changing out nasty fans with lovely new ones on the front porch, leveling the subfloor in Lake's room so we can lay the hardwood, etc, etc.  I also have spent some time prepping for Christmas - making tags for gifts, making gifts, etc, etc.  I have made some cute stuff that I can't post on the blog because the recipients read this!  I will share them all after they are opened...

Today we changed out the mailbox.  Sounds like no big deal but IT IS A HUGE DEAL!  The mailbox that was here was HORRIBLE. SHAMEFUL.  EMBARRASSING.  And I am so excited it is gone.  In the dump.

Check it out:
Yep, there's only a 6 on it.  So gross.

Here is my new pretty one.  I made the address in vinyl with my Cricut machine.
Such a little change makes such a huge difference.  I am happy.

Tuesday, September 11, 2012

Bedroom Buffet

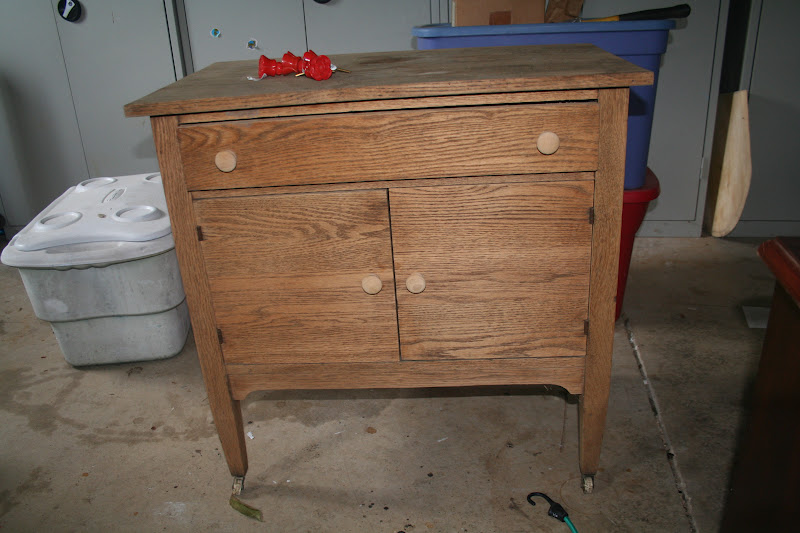
I bought this lovely antique falling-apart buffet at Goodwill for $29.99.  It's been sitting in the dining room screaming HELP! for several months.  Well, since before Easter.  My sister-in-law (God bless her; she is fearless) and I decided to tackle this one this last weekend on my birthday.  This piece ended up kicking my ....


See that warped veneer on the top?  Yea, it took HOURS of sanding.  Hours.  We peeled the veneer off, no problem.  The 50 year old glue didn't come off as easy.  After watching this debacle transpire, my husband (while staring at the lovely finished product I am about to reveal) said "well, I've decided you need a better sander".   Yes, I do.  Please get me a better sander.

We were working on this piece on the front porch, trying to stay out of the heat but still outside so we wouldn't get dust everywhere.  Being that it was my birthday, we found a stopping point and left for my Dad's house (he was cooking dinner for me!).  So, then came the MONSOON.  It rained and rained, and my buffet drawers, while under the porch, got soaked.  The wood expanded and they wouldn't fit in the buffet anymore.  I was sad.

At this point, my spirit was broken.  I had looked at this antique piece in Goodwill and thought, I can fix you.  We can work this out together.  But I had bruises on my knuckles and wet drawers.  I was done.  I was ready to break up.

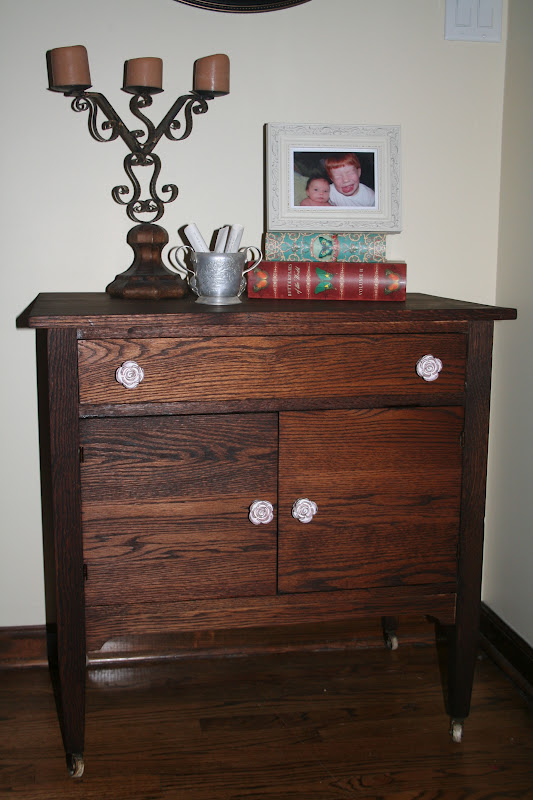
And then my husband came up with Plan B.  It was a good plan.  I liked it.  I didn't want my bruised knuckles to have been for nothing.  So here we go.  Plan B.  No drawers - shelves!!!!


He helped me cut some wood, build some shelves, and add some trim.  And then he vanished to get on the tractor but that's another story...so I painted and distressed and antiqued and added hardware and then she was done.  I was exhausted.  Was it worth it? You bet.  Nobody else has one of these that cost $30 and was made with so much love and pain.


I don't know what I am going to put on the bottom shelf yet, and I have some fun stuff to hang above it, so it is not fancied up yet.  What do you think?


Tuesday, September 4, 2012

File Cabinet Makeover

I am starting to think about how to set up my office, the one the kids are sleeping in until we get their floor laid upstairs :).  A file cabinet is one of those functional yet ugly items that every office needs.  We found an old metal file cabinet in one of the mini storage lockers my husband bought (YUUUP, HE THINKS HE IS ON STORAGE WARS.)  While it was nasty and pretty sub par for MY idea of good office decor, appearances can easily be changed.  It did take some convincing that I could make this thing usable and we should keep it instead of selling it.  But I am convincing.

I can't find my before picture of the file cabinet, but you know what it looked like.We spray painted the dingy silver-looking handles with oil-rubbed bronze to kick this project off.  And the we started tearing pages out of a book and modge-podging them on!

 I know you are wondering what book was used...my file cabinet is covered in The Hunger Games.  Yea, we are cool like that.

After we got the whole thing covered in words, I painted the part where you put a label with chalkboard paint.

 This project was completed for a cost of zero dollars (the BEST kind of projects!).  I used all stuff I had.  And now it's not quite so ugly...yay!

Tuesday, August 14, 2012

Laundry Room Curtain

OK,  I am pretty proud of this one.  I made the curtain in the laundry room for about $8.  Most of what I used were materials left over from other stuff.  The window is not big and I didn't need  anything fancy (it IS the laundry room...the place were only I go...no one else touches the laundry around here) but I sure was sick of looking at...nothing.  As much time as I spend in this tiny room, I would at least like for it to be...cute.  Cute? OK, just something other than blank.  So here is the window...
I had burlap leftover from another project (which I will be featuring in another blog post if I ever get it finished...).  I had the curtain rod left over from Lake's bedroom at the old house.  He had only one window in his old room and he has two windows in the new room so no use for one lone curtain rod...it was silver though.  A quick hit of spray paint, the same color as the light fixture in the laundry room, and it was good as new.

Light fixture, as a reminder...
Kinda fuzzy...sorry about that. 

So I spray painted the curtain rod, cut some leftover burlap, sewed a pocket across the top, and tied some ribbon on it.  And here it is!
How cute is that! I spent $8 on the ribbon (Walmart!) and that's it.  I can't wait to show the rest of the room, but I am still working on the cabinetry.  It is painted the red that is in the ribbon, but it has no countertop or sink yet...coming soon.  I also have some fun stuff to hang on the walls. 

Here are some more views of the curtain. 
I left the sides and bottom edges raw...I don't care if they unravel a bit.  It will give it character.

So yay! Another project bites the dust (yes, I was singing Queen as I typed that...). 

Saturday, August 4, 2012

Entry Hall Dresser

I have had this old dresser/side table/whatever you want to call it since my mom handed it down to me when I moved out in college.  It was her grandfather's (I think..?) and she didn't want to get rid of it.  In my first apartment, the tv sat on it.  When I had Lake, it became his nightstand and I decoupaged some old Western magazine covers on the doors to match his cowboy themed room.  It was very cute.  Well, when we ditched the cowboy room and decided to redo it and get those magazines off the doors, I was disappointed to find out what a task that was.  Those suckers were stuck.  In the garage it went.  With cowboy doors.  For a long time. 

My father-in-law decided it would be a good project for him and he took it home with him after one of his visits.  A few years later...he sends it back, completely stripped and good as new.  His one request was that I didn't PAINT it, since it had been such a beast to get back to the original wood. 
I bought these really cute rose knobs at Anthropologie months and months ago intending to use them on a chest for the guest room.  That didn't happen and the knobs were still hanging around in a bag waiting on a purpose.
While the color wouldn't go with the entry hall, which is where I had in mind for the dresser, I figured I've spray painted everything else except the cat, so I might as well make these whatever color would work and use them rather than buying others.

I stained the dresser, spray painted the knobs with white but left a little red showing through and then put glaze on top, and brought it in.

And here it is.  In its new spot.  Cozy by the front door.
What do you think of the knobs?
What I have on top of the dresser is not permanent...I threw it on there for now, but I definitely need something lighter to offset the dark wood of the dresser and the floor.  If I come up with something creative, I will post it.   Maybe some white pottery?  I don't know...we'll see what comes to mind in the middle of the night; that's when I my best thinking!

Lilly's Chandelier

  I wanted Lilly to have a chandelier in her room and I was not going to pay full price for one...I knew if I could find an ugly cheap one on craigslist, I could work some magic on it and make it pretty.  I bought this ugly brass chandelier on craigslist for $30.


A little scrubbing and a can of spray paint and a new chandelier emerged...
We have her ceiling scraped and painted, and I hopefully can get her walls painted in the next week so the hardwood can go down. 

Here it is with the lights on:
That's kinda spooky looking,

Not bad for $30 and a can of spray paint.  If I had bought one at Lowe's I would have spent over $100 easily.  And SURELY it wouldn't be as shabby chic, RIGHT?

The Front Door

I painted the front door quite a while ago, but I am just now getting around to posting it.  It was not terrible in its original state, but certainly not my taste.  I hope to find some really cool double doors with huge windows on craigslist at some point, and when I do I will rip this sucker out in a heartbeat.  But for now, it stays.  Here's what it looked like:

Note the really ugly door knob and light fixture. 
Of course, my little model wanted to be in the pictures...
The light fixtures were the first thing we changed.
I painted the door a brick red color.  Then I put antiquing glaze on it and changed the door knob.
  Maybe I can live with it a little longer now...

What do you think?

Sunday, July 22, 2012

Office Chair Makeover

I haven't begun to work on my office in the new house because the children are still sleeping in there...we still have to lay the floor in their bedrooms upstairs so they haven't been able to move up there yet.  I did get Lake's room ceiling, room, and closet painted and have started on Lilly's by painting and hanging her chandelier (the details and pics will be forthcoming in another blog post - stay tuned!).  It's progress...we are hoping to have the floor upstairs laid within the next month.  There's just so much to do and not enough hours in the day!

We started cleaning out the garage this weekend and I realized how many pieces of furniture and other projects were stuffed in there around, under, and in between all of the other...junk.  So I am on a mission to get those projects done and out of the garage quickly, even if I have no completed rooms upstairs in which to put them!

OK, that's not entirely true...the guest room has flooring and I could put each thing as it's finished in there for the time being.  Which would make room in the garage for me to store more "projects"  (hehe).    This wooden chair seemed like a quick one I could handle in a couple of hours so it got to go first.
I bought this chair 13 years ago at a junk store for $20 when we bought our first house.  I stained it that long ago and haven't redone it since then.  I have covered the seat cushion a couple of times over the years, but it is in rough shape now and ready for a face lift.  It is a very sturdy, well made chair and I love the shape.  It has always been in our bathroom, and I have spent many hours sitting in that chair straightening my hair (oh, the wasted hours...).  But in the new house, the old faithful chair gets a new purpose.  It is going in my office and will be where I spend hours sitting on the computer working...also wasted hours?!?!?

I sanded, spray painted, distressed it, and covered the cushion.  Twelve bucks and two hours later and we have a new chair.


I like it; what do you think?

Saturday, July 7, 2012

Old Dresser Makeover

I took an old dirty dresser from the 70's and gave it a makeover for the guest room.   The guest room is the only room upstairs in which we have laid the floor.  Since we were having guests this weekend, I needed to get that room set up or at least set up enough so that people could sleep in it.  I got the bed set up and the blinds up, but I still have to paint the headboard, paint the junk store lamps I bought for in there, make a bench to go at the end of the bed, redo an antique rocking chair and a side table, and paint an old writing desk and chair for this room.  No big thang, right?  Should be done in no time...ha!

We have scraped and painted the ceiling, hung a new light fixture, painted the walls, and laid the floor so far so we are making progress...just still so much to do.  Once I get the room complete, I will show you how it turned out.

This blog entry was supposed to be about a dresser; I digress.  Back to the dresser....here she is in all her ugly glory. 

Ugly as can be, but very sturdy and made of real wood.  I sanded, scrubbed, painted and painted and painted (3 coats!).  Spray painted the handles oil-rubbed bronze and she was good to go. 

A little better, eh?

One more piece out of the garage!  Whew!

Sunday, July 1, 2012

The Entry Hall Mirror

This ugly old mirror came with an ugly old dresser that I am redoing for the guest bedroom.  I didn't want to put the mirror with the dresser because I have a really cool oil painting of Venice that I want to hang above the dresser.  I also didn't want the mirror hanging out in my garage any longer so it needed a makeover and a place to hang.
However, this ugly mnostrosity was not coming in my house in this condition.  A lot of scrubbing, a little spraypaint, and a little antiquing glaze was all she needed, and in the entry hall she went!
I got this antique church pew from my mother-in-law.  I made the big pillow from some fabric I recently picked up from Hancock's (with no plan for it in mind, of course - until now).  The smaller pillow was a score for $10 at Marshall's. 
I am still working on the other end of the entry hall and will post pics when I get it complete.  What do you think so far?