Showing posts with label House Tour. Show all posts

Monday, June 11, 2012

The Dining Room

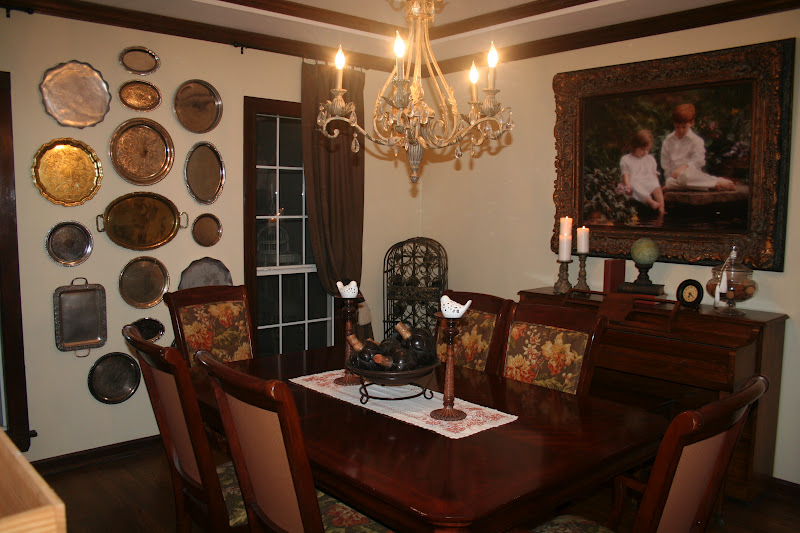
I thought I would go ahead and show you the dining room - even though it is still very unfinished.  I had originally thought I would paint the dining table and chairs and have the chairs recovered (again) but I knew that would be at the bottom of the priority list since they were not horrible as they are.  Not necessarily the room I had in mind, but I have to say...once I got everything in there, it kind of works.  The whole vibe of the the room is a little darker than the rest of the house, but I think I like the old world vibe the dining room is bringing right now.  In the old house, the dining room was very open to the den and kitchen and so I always had to coordinate all three rooms with the same colors and fabrics.  It dawned on me recently that I don't really have to do that anymore...so if this room has a little different flair...it's ok.

Here is the very bare dining room when we got the house.

You will notice the very ugly light fixture is lying in the floor.  Why?  I have no idea.  It is the same light fixture that I spray painted and hung in the laundry room. 

A little reminder...
Ok, back to the dining room now...here it is!
The wall of trays courtesy of Goodwill and the antique store...

The view from the front door.
I still need blinds in here and I need a solution for the other corner...the one I haven't shown yet.  It's not pretty....but here it is.

Yep, it's the catch all corner for projects I still have yet too do...my VERY vintage 1970's chair that was a steal for $19.99 at Goodwill.  It will be recovered for the office (someday).  And the buffet was also a find at Goodwill for only $29.99.  I plan on painting it and making it my jewelry cabinet to go in my bedroom...that project will be happening very soon.  The problem is..what goes in this corner?  I have no idea.  I am open for suggestions.  I am hoping it will come to me in the middle of the night (that's when my brain comes up with the best ideas) but for now, it holds the hodge podge of things undone. 

I think I am content with the rest of the room for now.  I am sure that as soon as I get the floor laid in the children's rooms and I mark some of the really important items off the to-do list, I will eventually get back to thinking about this room and what I want it to be.  Just not today.

Saturday, April 21, 2012

Kitchen Cabinets

The kitchen cabinets needed an overhaul (as did every other thing in this house) and we didn't plan on replacing them so I had to figure out what to do to make them work for us.  Paint is magical.  Seriously.  I am always amazed at how just painting something can completely transform it and everything around it.  Painting kitchen cabinets is a long and painful process, but totally worth the time and effort when you see how they completely make the kitchen look new afterwards.  Here is the kitchen before:
Quite ugly, don't you agree? 

I sanded and sanded, which took several days.  Then I painted three coats of antique white on the top cabinets and the ones on the wall above.  I wanted to give the room a splash of color too since the walls and most of the cabinets would be antique white, so I used a country blue on the bottom cabinets around the breakfast bar. 

Three coats!  I painted and painted and was cussing these cabinets before I was done.  This is definitely a project you only tackle once every ten years or so because it is a lot of work and it takes a long time.  I had to paint three coats on each cabinet door, wait at least overnight, flip them, sand the edges (again!), and then paint three coats on the backs. 

After all of the painting, I sanded the edges of the doors and cabinets to give it an antigue finish.  Then I sealed them all with a coat of polyeurethane.  The poly gave them a yellowish tint, which I was upset about at first, but it's ok.  It adds to the antique feel.  Now that they are done I love them and it was totally worth the effort.  The kitchen doesn't look like the same kitchen at all.

Here they are - DONE!


I also hung my chalkboard up in the kitchen and am putting a quote on it each week.  The kids have really enjoyed this.
So there you have it.  What do you think of the cabinets? 

Monday, April 16, 2012

The Pool

As I mentioned in a previous blog entry, the new pool is (was) green.  Really green. Swampy green complete with frogs.  And lots of overgrown weeds and cracked concrete.  And a broken fence.
Isn't that lovely?

We had some experts come and get the pool cleaned out and ready for swimming.  Amazing that the green water became pretty blue water.  The frogs have found another home. 
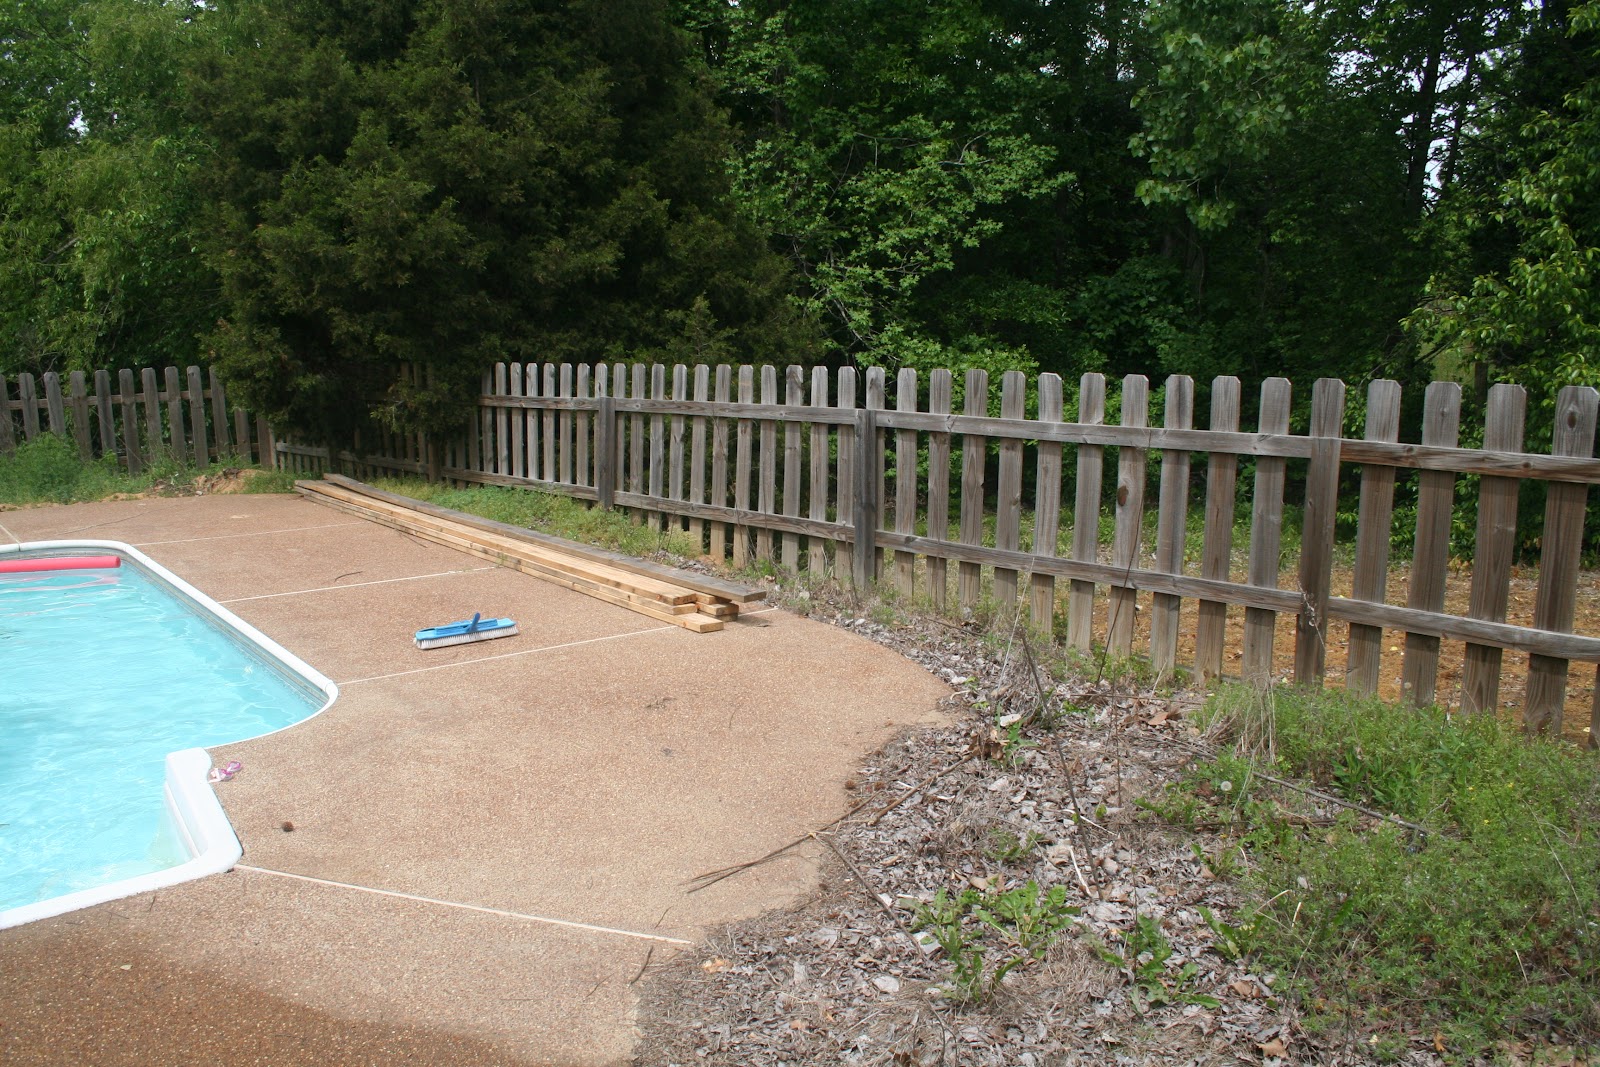
But the area around the pool was still a mess. 

It needed some SERIOUS help.  So here we go...

In one week's time, this yard went from disgusting to fabulous.  A super big thank you to my father for his help and expertise. 

And here's what we have now...
 We plan on adding a pergola here in the near future.  And we have an outdoor kitchen planned for the North side of the pool, but we will wait a while before tackling that project.
Several ugly trees have been removed, we have new concrete and flower beds full of knockout roses, banana trees, and Japanese maples, and we have patio furniture.  This pool is ready for a party :)!


Next steps are to stain the fence with a white wash, stain the new concrete to give it some pizzazz, and find an antique iron headboard to serve as the gate.  I want to have all of this finished by the end of next month for my daughter Lilly's 7th birthday party.  Lots to do...and all I REALLY want to do is curl up on one of those lounge chairs and relax with a good book...it's so nice to have a beautiful retreat in the backyard.  We don't want to go inside the house anymore!

Tuesday, April 3, 2012

Downstairs Hall

The hall was the last room (if you can call a hall a room) to paint on the bottom floor.  We had a situation with the hall ceiling which caused it to take longer and get moved to last.  We scraped every celing in the house (all 4,000 sq ft! Not fun!) except for the kitchen and the hall.  These two areas had been painted over at some point in time and when we tried to scrape them the drywall started tearing up.  So on to Plan B. 

We had bigger issues than the drywall with the ceiling in the kitchen, as we had to take part of it out to add a support beam to level the upstairs floor (see previous post).  We ended up laying wood on the kitchen ceiling instead of painting it.  For the hall, we ended up mudding over the popcorn ceiling and smoothing it out.  This took three coats of mud and some sanding in between each one.  It is smooth and pretty now and looks like all of the others. 

A paintbrush has hit every wall and every ceiling on the bottom floor finally.  Success feels sweet.

Here's the hall before (ceiling already smooth - I have no photo of before we did that).  It's an L shape with one leg leading to the master bedroom and the other leg leading to the laundry room and back stairs. 
I struggled with what to do for light fixtures in here.  I couldn't make up my mind what style I wanted and quite frankly I held off because I was looking for a deal.  We have so so many light fixtures to replace in this house (I have counted around 50) and lights are expensive!  I knew that at 2am one morning, which is when I do my best thinking, a plan would hit me.  And it did.

I bought two lamps with old burlap shades at a junk/antique store last year.  They have been sitting waiting on me to decide what to do with them and where to put them.  The lamps are ugly and will need a makeover (which I think I can handle - wink, wink).  But those shades have the rustic look we've got going on here.  So off to Lowe's for some hanging light kits and we were in business. 
We ended up getting plain hanging pendant lights, the kind you would hang over a bar and to which you would add a glass globe.  We just took the cord out of the base, slipped the lampshade on, stuck the cord back through, and hung.  We cut the cord to the length we wanted so the lights weren't too low for a hall.  Talk about a cheap and easy solution!  I spent next to nothing on the these contraptions, and they aren't too shabby if I do say so myself :). 

And here's how they turned out.

For the life of me, I cannot get that picture to turn right side up when I load it.  It is showing the right way and then it loads in here sideways - CRAZY.  I'm not wasting any more time on it; you get the picture (haha).
We wanted to make the hall functional space, as I am on a mission to organize our lives as part of the remodel of this house.  I wanted a place for the kids to put their backpacks and jackets instead of on my kitchen floor.  We have no mud room, so we needed to make this hall work as one. 

We added a cedar board and hooks on it down the length of the wall.  Since I went with my old faithful antique white paint which is kind of boring, I also wanted to spruce it up a little and so I added some cream colored stripes on that wall under the board.  And voila!

A closer look at my hooks and stripes.


Yes, I realize that I have one door that is white and the rest are painted with my antique finish.  Cut me some slack here. I will get to it...

I will add some art at some point and I have a plan for a homemade corkboard out of wine corks to go on the wall opposite the hooks to hold school papers, photos, etc.  All in due time. 
Now the kids have a place to hang their junk and I have no more unpainted surfaces (besides that door!) on the bottom floor.  This can only mean one thing...time to head upstairs!

Friday, March 30, 2012

Bathroom #2

We have finished the half bath under the back stairs.  I didn't originally intend on making this bathroom a priority or even putting it anywhere on the list until the upstairs floor was laid and the kids were actually living in their rooms, but this room just worked itself into the plans and now it's done.  In hindsight, it should have been on the list as a priority anyway because we use it constantly.  I really expected that it wouldn't get much use since we have two other bathrooms on the bottom floor.  Not the case.  It's closest to the back door and closest to the kitchen, so it is pretty handy after all...

Here is the bathroom when we got the house. 
The bathroom is a bit odd shaped withe the toilet being in a little cubby behind the door.  I had intended on finding a dresser or hutch and putting a sink in it to serve as the vanity.  I came across one already done in a local store.  Nothing but luck on that one - the dresser was exactly what I had in mind and it fit like a glove in this space.  I actually found it before we bought the house and had no idea where it would end up, but I knew I could find a place for it.  So I bought it and saved it.  It was exactly the width of the old vanity in this bathroom, which is probably what led us to go ahead and do this bathroom.  We only needed to buy a toilet.

Here's the room now.
I also have painted all of the doors on the bottom floor with an antique finish.  That project has taken me weeks to finish, a little at a time.  Each door took 3 coats - two of a tan base coat and one of antiquing glaze.  Here's better view of the door.
So what do you think?  I like how it turned out. 


Only 3 bathrooms to go...

Sunday, March 25, 2012

The Fireplace

We got the den ceiling scraped and painted a pale blue.  We hung the new fan.  We ripped out the nasty carpet and laid new hardwood floor.  Now, the fireplace.  Here was the den when we got the house.
 I sold the fireplace mantle on craigslist the first week after we closed.  I had big plans for the fireplace but it took us a while to finally get to it on the list.  Here's what it looked like two weeks ago.
Pretty ugly.  I picked out some pretty awesome travertine mosaic tiles at Lowe's to cover the red brick.  I wanted the tile to have a natural look, with holes and rough edges.  This tile was perfect.
We got the tile on, got it grouted, and got several coats of sealer on it to give it a little sheen.  And then we put up my favorite part - the mantle.  It is a cedar log that has been drying for 5 years.  It was planed and sanded and hung up to make my fireplace lovely.  And here is the finished fireplace...

It totally changes the look of the room.  The room feels homier now, lived in. 


This room is starting to come together and it's exciting!  The furniture will go upstairs in the game room once we get it ready and I will get new furniture for this room.  Can't wait for that.  I still need to paint the French doors leading to the back yard on the other wall adjacent to the fireplace, but all other cosmetic changes to this room are complete.  It feels good.

The before again.

And after.
  What do you think?