OK, I am pretty proud of this one. I made the curtain in the laundry room for about $8. Most of what I used were materials left over from other stuff. The window is not big and I didn't need anything fancy (it IS the laundry room...the place were only I go...no one else touches the laundry around here) but I sure was sick of looking at...nothing. As much time as I spend in this tiny room, I would at least like for it to be...cute. Cute? OK, just something other than blank. So here is the window...
I had burlap leftover from another project (which I will be featuring in another blog post if I ever get it finished...). I had the curtain rod left over from Lake's bedroom at the old house. He had only one window in his old room and he has two windows in the new room so no use for one lone curtain rod...it was silver though. A quick hit of spray paint, the same color as the light fixture in the laundry room, and it was good as new.
Light fixture, as a reminder...
Kinda fuzzy...sorry about that.
So I spray painted the curtain rod, cut some leftover burlap, sewed a pocket across the top, and tied some ribbon on it. And here it is!
How cute is that! I spent $8 on the ribbon (Walmart!) and that's it. I can't wait to show the rest of the room, but I am still working on the cabinetry. It is painted the red that is in the ribbon, but it has no countertop or sink yet...coming soon. I also have some fun stuff to hang on the walls.
Here are some more views of the curtain.
I left the sides and bottom edges raw...I don't care if they unravel a bit. It will give it character.
So yay! Another project bites the dust (yes, I was singing Queen as I typed that...).
Tuesday, August 14, 2012
Saturday, August 4, 2012
Entry Hall Dresser
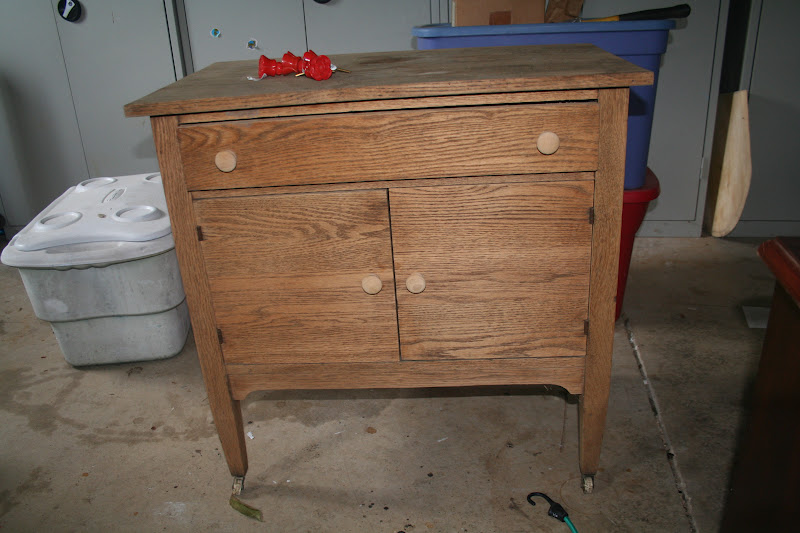
I have had this old dresser/side table/whatever you want to call it since my mom handed it down to me when I moved out in college. It was her grandfather's (I think..?) and she didn't want to get rid of it. In my first apartment, the tv sat on it. When I had Lake, it became his nightstand and I decoupaged some old Western magazine covers on the doors to match his cowboy themed room. It was very cute. Well, when we ditched the cowboy room and decided to redo it and get those magazines off the doors, I was disappointed to find out what a task that was. Those suckers were stuck. In the garage it went. With cowboy doors. For a long time.
My father-in-law decided it would be a good project for him and he took it home with him after one of his visits. A few years later...he sends it back, completely stripped and good as new. His one request was that I didn't PAINT it, since it had been such a beast to get back to the original wood.
I bought these really cute rose knobs at Anthropologie months and months ago intending to use them on a chest for the guest room. That didn't happen and the knobs were still hanging around in a bag waiting on a purpose.
While the color wouldn't go with the entry hall, which is where I had in mind for the dresser, I figured I've spray painted everything else except the cat, so I might as well make these whatever color would work and use them rather than buying others.
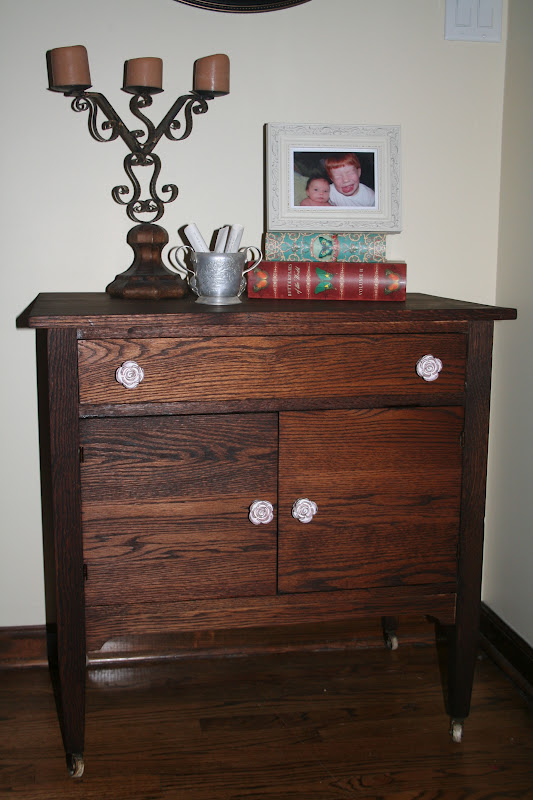
I stained the dresser, spray painted the knobs with white but left a little red showing through and then put glaze on top, and brought it in.
And here it is. In its new spot. Cozy by the front door.
What do you think of the knobs?
What I have on top of the dresser is not permanent...I threw it on there for now, but I definitely need something lighter to offset the dark wood of the dresser and the floor. If I come up with something creative, I will post it. Maybe some white pottery? I don't know...we'll see what comes to mind in the middle of the night; that's when I my best thinking!
My father-in-law decided it would be a good project for him and he took it home with him after one of his visits. A few years later...he sends it back, completely stripped and good as new. His one request was that I didn't PAINT it, since it had been such a beast to get back to the original wood.
I bought these really cute rose knobs at Anthropologie months and months ago intending to use them on a chest for the guest room. That didn't happen and the knobs were still hanging around in a bag waiting on a purpose.
While the color wouldn't go with the entry hall, which is where I had in mind for the dresser, I figured I've spray painted everything else except the cat, so I might as well make these whatever color would work and use them rather than buying others.
I stained the dresser, spray painted the knobs with white but left a little red showing through and then put glaze on top, and brought it in.
And here it is. In its new spot. Cozy by the front door.
What do you think of the knobs?
What I have on top of the dresser is not permanent...I threw it on there for now, but I definitely need something lighter to offset the dark wood of the dresser and the floor. If I come up with something creative, I will post it. Maybe some white pottery? I don't know...we'll see what comes to mind in the middle of the night; that's when I my best thinking!
Lilly's Chandelier
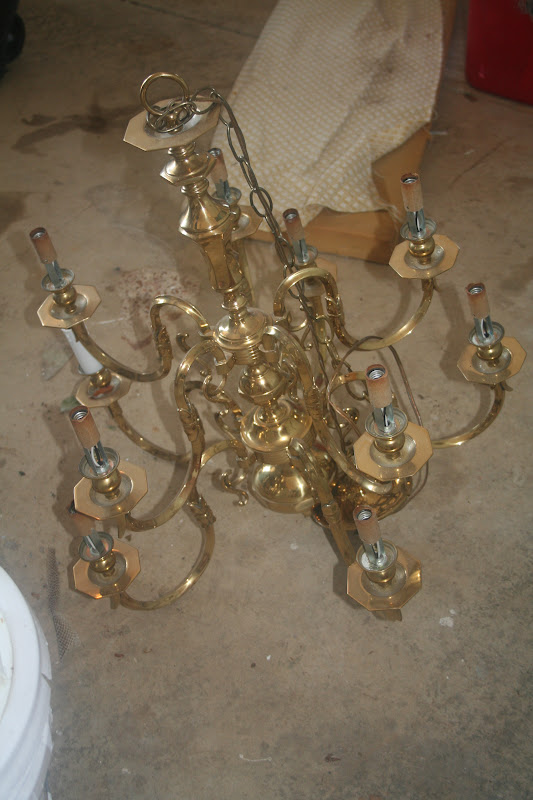
I wanted Lilly to have a chandelier in her room and I was not going to pay full price for one...I knew if I could find an ugly cheap one on craigslist, I could work some magic on it and make it pretty. I bought this ugly brass chandelier on craigslist for $30.
A little scrubbing and a can of spray paint and a new chandelier emerged...
We have her ceiling scraped and painted, and I hopefully can get her walls painted in the next week so the hardwood can go down.
Here it is with the lights on:
That's kinda spooky looking,
Not bad for $30 and a can of spray paint. If I had bought one at Lowe's I would have spent over $100 easily. And SURELY it wouldn't be as shabby chic, RIGHT?
The Front Door
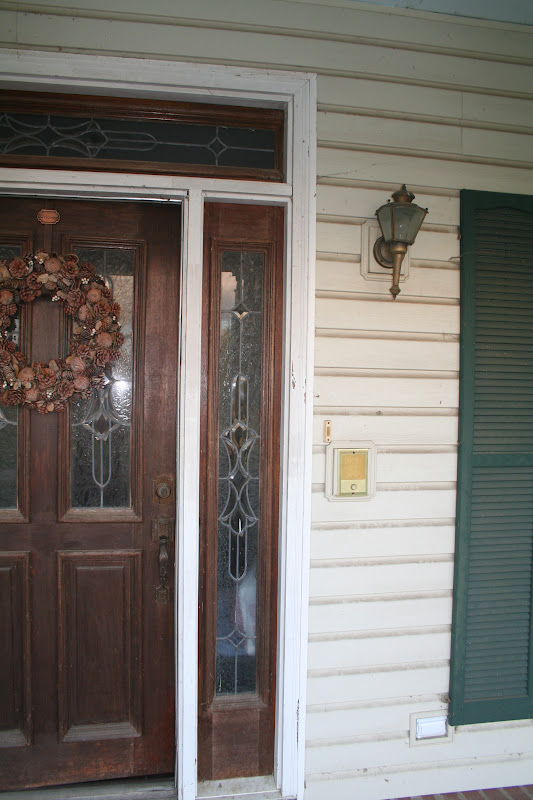
I painted the front door quite a while ago, but I am just now getting around to posting it. It was not terrible in its original state, but certainly not my taste. I hope to find some really cool double doors with huge windows on craigslist at some point, and when I do I will rip this sucker out in a heartbeat. But for now, it stays. Here's what it looked like:
Note the really ugly door knob and light fixture.
Of course, my little model wanted to be in the pictures...
The light fixtures were the first thing we changed.
I painted the door a brick red color. Then I put antiquing glaze on it and changed the door knob.
Maybe I can live with it a little longer now...
What do you think?
Note the really ugly door knob and light fixture.
The light fixtures were the first thing we changed.
I painted the door a brick red color. Then I put antiquing glaze on it and changed the door knob.
Maybe I can live with it a little longer now...
What do you think?
Sunday, July 22, 2012
Office Chair Makeover
I haven't begun to work on my office in the new house because the children are still sleeping in there...we still have to lay the floor in their bedrooms upstairs so they haven't been able to move up there yet. I did get Lake's room ceiling, room, and closet painted and have started on Lilly's by painting and hanging her chandelier (the details and pics will be forthcoming in another blog post - stay tuned!). It's progress...we are hoping to have the floor upstairs laid within the next month. There's just so much to do and not enough hours in the day!
We started cleaning out the garage this weekend and I realized how many pieces of furniture and other projects were stuffed in there around, under, and in between all of the other...junk. So I am on a mission to get those projects done and out of the garage quickly, even if I have no completed rooms upstairs in which to put them!
OK, that's not entirely true...the guest room has flooring and I could put each thing as it's finished in there for the time being. Which would make room in the garage for me to store more "projects" (hehe). This wooden chair seemed like a quick one I could handle in a couple of hours so it got to go first.
I bought this chair 13 years ago at a junk store for $20 when we bought our first house. I stained it that long ago and haven't redone it since then. I have covered the seat cushion a couple of times over the years, but it is in rough shape now and ready for a face lift. It is a very sturdy, well made chair and I love the shape. It has always been in our bathroom, and I have spent many hours sitting in that chair straightening my hair (oh, the wasted hours...). But in the new house, the old faithful chair gets a new purpose. It is going in my office and will be where I spend hours sitting on the computer working...also wasted hours?!?!?
I sanded, spray painted, distressed it, and covered the cushion. Twelve bucks and two hours later and we have a new chair.
We started cleaning out the garage this weekend and I realized how many pieces of furniture and other projects were stuffed in there around, under, and in between all of the other...junk. So I am on a mission to get those projects done and out of the garage quickly, even if I have no completed rooms upstairs in which to put them!
OK, that's not entirely true...the guest room has flooring and I could put each thing as it's finished in there for the time being. Which would make room in the garage for me to store more "projects" (hehe). This wooden chair seemed like a quick one I could handle in a couple of hours so it got to go first.
I bought this chair 13 years ago at a junk store for $20 when we bought our first house. I stained it that long ago and haven't redone it since then. I have covered the seat cushion a couple of times over the years, but it is in rough shape now and ready for a face lift. It is a very sturdy, well made chair and I love the shape. It has always been in our bathroom, and I have spent many hours sitting in that chair straightening my hair (oh, the wasted hours...). But in the new house, the old faithful chair gets a new purpose. It is going in my office and will be where I spend hours sitting on the computer working...also wasted hours?!?!?
I sanded, spray painted, distressed it, and covered the cushion. Twelve bucks and two hours later and we have a new chair.
I like it; what do you think?
Saturday, July 7, 2012
Old Dresser Makeover
I took an old dirty dresser from the 70's and gave it a makeover for the guest room. The guest room is the only room upstairs in which we have laid the floor. Since we were having guests this weekend, I needed to get that room set up or at least set up enough so that people could sleep in it. I got the bed set up and the blinds up, but I still have to paint the headboard, paint the junk store lamps I bought for in there, make a bench to go at the end of the bed, redo an antique rocking chair and a side table, and paint an old writing desk and chair for this room. No big thang, right? Should be done in no time...ha!
We have scraped and painted the ceiling, hung a new light fixture, painted the walls, and laid the floor so far so we are making progress...just still so much to do. Once I get the room complete, I will show you how it turned out.
This blog entry was supposed to be about a dresser; I digress. Back to the dresser....here she is in all her ugly glory.
Ugly as can be, but very sturdy and made of real wood. I sanded, scrubbed, painted and painted and painted (3 coats!). Spray painted the handles oil-rubbed bronze and she was good to go.
A little better, eh?
One more piece out of the garage! Whew!
We have scraped and painted the ceiling, hung a new light fixture, painted the walls, and laid the floor so far so we are making progress...just still so much to do. Once I get the room complete, I will show you how it turned out.
This blog entry was supposed to be about a dresser; I digress. Back to the dresser....here she is in all her ugly glory.
Ugly as can be, but very sturdy and made of real wood. I sanded, scrubbed, painted and painted and painted (3 coats!). Spray painted the handles oil-rubbed bronze and she was good to go.
A little better, eh?
One more piece out of the garage! Whew!
Sunday, July 1, 2012
The Entry Hall Mirror
This ugly old mirror came with an ugly old dresser that I am redoing for the guest bedroom. I didn't want to put the mirror with the dresser because I have a really cool oil painting of Venice that I want to hang above the dresser. I also didn't want the mirror hanging out in my garage any longer so it needed a makeover and a place to hang.
However, this ugly mnostrosity was not coming in my house in this condition. A lot of scrubbing, a little spraypaint, and a little antiquing glaze was all she needed, and in the entry hall she went!
I got this antique church pew from my mother-in-law. I made the big pillow from some fabric I recently picked up from Hancock's (with no plan for it in mind, of course - until now). The smaller pillow was a score for $10 at Marshall's.
I am still working on the other end of the entry hall and will post pics when I get it complete. What do you think so far?
However, this ugly mnostrosity was not coming in my house in this condition. A lot of scrubbing, a little spraypaint, and a little antiquing glaze was all she needed, and in the entry hall she went!
I got this antique church pew from my mother-in-law. I made the big pillow from some fabric I recently picked up from Hancock's (with no plan for it in mind, of course - until now). The smaller pillow was a score for $10 at Marshall's.
I am still working on the other end of the entry hall and will post pics when I get it complete. What do you think so far?
Monday, June 11, 2012
The Dining Room
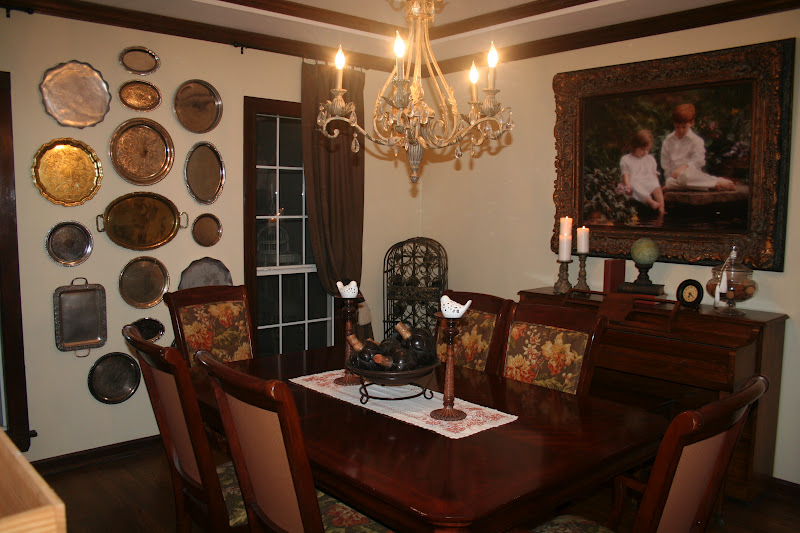
I thought I would go ahead and show you the dining room - even though it is still very unfinished. I had originally thought I would paint the dining table and chairs and have the chairs recovered (again) but I knew that would be at the bottom of the priority list since they were not horrible as they are. Not necessarily the room I had in mind, but I have to say...once I got everything in there, it kind of works. The whole vibe of the the room is a little darker than the rest of the house, but I think I like the old world vibe the dining room is bringing right now. In the old house, the dining room was very open to the den and kitchen and so I always had to coordinate all three rooms with the same colors and fabrics. It dawned on me recently that I don't really have to do that anymore...so if this room has a little different flair...it's ok.
Here is the very bare dining room when we got the house.
You will notice the very ugly light fixture is lying in the floor. Why? I have no idea. It is the same light fixture that I spray painted and hung in the laundry room.
A little reminder...
Ok, back to the dining room now...here it is!
The wall of trays courtesy of Goodwill and the antique store...
I think I am content with the rest of the room for now. I am sure that as soon as I get the floor laid in the children's rooms and I mark some of the really important items off the to-do list, I will eventually get back to thinking about this room and what I want it to be. Just not today.
Here is the very bare dining room when we got the house.
You will notice the very ugly light fixture is lying in the floor. Why? I have no idea. It is the same light fixture that I spray painted and hung in the laundry room.
A little reminder...
Ok, back to the dining room now...here it is!
The wall of trays courtesy of Goodwill and the antique store...
The view from the front door.
I still need blinds in here and I need a solution for the other corner...the one I haven't shown yet. It's not pretty....but here it is.
Yep, it's the catch all corner for projects I still have yet too do...my VERY vintage 1970's chair that was a steal for $19.99 at Goodwill. It will be recovered for the office (someday). And the buffet was also a find at Goodwill for only $29.99. I plan on painting it and making it my jewelry cabinet to go in my bedroom...that project will be happening very soon. The problem is..what goes in this corner? I have no idea. I am open for suggestions. I am hoping it will come to me in the middle of the night (that's when my brain comes up with the best ideas) but for now, it holds the hodge podge of things undone. I think I am content with the rest of the room for now. I am sure that as soon as I get the floor laid in the children's rooms and I mark some of the really important items off the to-do list, I will eventually get back to thinking about this room and what I want it to be. Just not today.
Sunday, May 20, 2012
Kitchen Side Table Makeover
My sister-in-law was given this side table from her neighbors. She didn't like the table at all, and quite frankly neither did I. She couldn't redo the table because she would have to have it outside in the driveway to sand and paint it and if this sweet little elderly man that gave it to her saw her doing this, she was afraid he would get his feelings hurt. He thought the table was grand as is...
Well, where do you think the tabe ended up? In MY house. Not that I am complaining; I never turn down free furnitutre - ugly or not. I love doing furniture makeovers. As I've said over and over again, it's amazing what a can of paint can do.
My sister-in-law came over yesterday while the husbands were off playing at duck hunting camp. We decided to tackle the table. It's been sitting in the kitchen (in all it's shiny oak stained glory - ugh). I put it there to sit for a few days while I stared at it and determined if that's where I wanted it to permanently be placed. That's been a couple of months so I guess that's where it is supposed to stay.
We sanded that shiny finish off and painted two coats of antigue white paint. Then we distressed it by sanding around the edges and curves. We gave it some new hardware and voila! The new table...
I had already hung my plates and favorite rabbit picture above the table so refinishing the table really made the wall look complete.
Not bad for FREE. Now on to the next project!
Well, where do you think the tabe ended up? In MY house. Not that I am complaining; I never turn down free furnitutre - ugly or not. I love doing furniture makeovers. As I've said over and over again, it's amazing what a can of paint can do.
My sister-in-law came over yesterday while the husbands were off playing at duck hunting camp. We decided to tackle the table. It's been sitting in the kitchen (in all it's shiny oak stained glory - ugh). I put it there to sit for a few days while I stared at it and determined if that's where I wanted it to permanently be placed. That's been a couple of months so I guess that's where it is supposed to stay.
We sanded that shiny finish off and painted two coats of antigue white paint. Then we distressed it by sanding around the edges and curves. We gave it some new hardware and voila! The new table...
I had already hung my plates and favorite rabbit picture above the table so refinishing the table really made the wall look complete.
Not bad for FREE. Now on to the next project!
Monday, May 14, 2012
Birthday Cupcakes, Duck Hunter Cupcakes, and a Crown Cake
We've had a lot of birthdays in our family over the last month. Which means I've been doing some baking.
My cousin's birthday was this past week and we had a joint party for her and my husband whose birthday is this coming week.
For her, I made two tiered cupcakes with a candle made from a chocolate covered pretzel.
For my duck hunting husband, I made cupcakes with camoflauge icing and a sugar cookie mallard on top.
My children call their grandmother Queenie (cute, right? they came up with that on their own...) so for her birthday, I made a crown fit for a Queen...
Just thought I'd share these with you...they were fun!
My cousin's birthday was this past week and we had a joint party for her and my husband whose birthday is this coming week.
For her, I made two tiered cupcakes with a candle made from a chocolate covered pretzel.
For my duck hunting husband, I made cupcakes with camoflauge icing and a sugar cookie mallard on top.
My children call their grandmother Queenie (cute, right? they came up with that on their own...) so for her birthday, I made a crown fit for a Queen...
Just thought I'd share these with you...they were fun!
Subscribe to:
Posts (Atom)
.jpg)
.jpg)