Sunday, July 22, 2012

Office Chair Makeover

I haven't begun to work on my office in the new house because the children are still sleeping in there...we still have to lay the floor in their bedrooms upstairs so they haven't been able to move up there yet.  I did get Lake's room ceiling, room, and closet painted and have started on Lilly's by painting and hanging her chandelier (the details and pics will be forthcoming in another blog post - stay tuned!).  It's progress...we are hoping to have the floor upstairs laid within the next month.  There's just so much to do and not enough hours in the day!

We started cleaning out the garage this weekend and I realized how many pieces of furniture and other projects were stuffed in there around, under, and in between all of the other...junk.  So I am on a mission to get those projects done and out of the garage quickly, even if I have no completed rooms upstairs in which to put them!

OK, that's not entirely true...the guest room has flooring and I could put each thing as it's finished in there for the time being.  Which would make room in the garage for me to store more "projects"  (hehe).    This wooden chair seemed like a quick one I could handle in a couple of hours so it got to go first.
I bought this chair 13 years ago at a junk store for $20 when we bought our first house.  I stained it that long ago and haven't redone it since then.  I have covered the seat cushion a couple of times over the years, but it is in rough shape now and ready for a face lift.  It is a very sturdy, well made chair and I love the shape.  It has always been in our bathroom, and I have spent many hours sitting in that chair straightening my hair (oh, the wasted hours...).  But in the new house, the old faithful chair gets a new purpose.  It is going in my office and will be where I spend hours sitting on the computer working...also wasted hours?!?!?

I sanded, spray painted, distressed it, and covered the cushion.  Twelve bucks and two hours later and we have a new chair.


I like it; what do you think?

Saturday, July 7, 2012

Old Dresser Makeover

I took an old dirty dresser from the 70's and gave it a makeover for the guest room.   The guest room is the only room upstairs in which we have laid the floor.  Since we were having guests this weekend, I needed to get that room set up or at least set up enough so that people could sleep in it.  I got the bed set up and the blinds up, but I still have to paint the headboard, paint the junk store lamps I bought for in there, make a bench to go at the end of the bed, redo an antique rocking chair and a side table, and paint an old writing desk and chair for this room.  No big thang, right?  Should be done in no time...ha!

We have scraped and painted the ceiling, hung a new light fixture, painted the walls, and laid the floor so far so we are making progress...just still so much to do.  Once I get the room complete, I will show you how it turned out.

This blog entry was supposed to be about a dresser; I digress.  Back to the dresser....here she is in all her ugly glory. 

Ugly as can be, but very sturdy and made of real wood.  I sanded, scrubbed, painted and painted and painted (3 coats!).  Spray painted the handles oil-rubbed bronze and she was good to go. 

A little better, eh?

One more piece out of the garage!  Whew!

Sunday, July 1, 2012

The Entry Hall Mirror

This ugly old mirror came with an ugly old dresser that I am redoing for the guest bedroom.  I didn't want to put the mirror with the dresser because I have a really cool oil painting of Venice that I want to hang above the dresser.  I also didn't want the mirror hanging out in my garage any longer so it needed a makeover and a place to hang.
However, this ugly mnostrosity was not coming in my house in this condition.  A lot of scrubbing, a little spraypaint, and a little antiquing glaze was all she needed, and in the entry hall she went!
I got this antique church pew from my mother-in-law.  I made the big pillow from some fabric I recently picked up from Hancock's (with no plan for it in mind, of course - until now).  The smaller pillow was a score for $10 at Marshall's. 
I am still working on the other end of the entry hall and will post pics when I get it complete.  What do you think so far?

Monday, June 11, 2012

The Dining Room

I thought I would go ahead and show you the dining room - even though it is still very unfinished.  I had originally thought I would paint the dining table and chairs and have the chairs recovered (again) but I knew that would be at the bottom of the priority list since they were not horrible as they are.  Not necessarily the room I had in mind, but I have to say...once I got everything in there, it kind of works.  The whole vibe of the the room is a little darker than the rest of the house, but I think I like the old world vibe the dining room is bringing right now.  In the old house, the dining room was very open to the den and kitchen and so I always had to coordinate all three rooms with the same colors and fabrics.  It dawned on me recently that I don't really have to do that anymore...so if this room has a little different flair...it's ok.

Here is the very bare dining room when we got the house.

You will notice the very ugly light fixture is lying in the floor.  Why?  I have no idea.  It is the same light fixture that I spray painted and hung in the laundry room. 

A little reminder...
Ok, back to the dining room now...here it is!
The wall of trays courtesy of Goodwill and the antique store...

The view from the front door.
I still need blinds in here and I need a solution for the other corner...the one I haven't shown yet.  It's not pretty....but here it is.

Yep, it's the catch all corner for projects I still have yet too do...my VERY vintage 1970's chair that was a steal for $19.99 at Goodwill.  It will be recovered for the office (someday).  And the buffet was also a find at Goodwill for only $29.99.  I plan on painting it and making it my jewelry cabinet to go in my bedroom...that project will be happening very soon.  The problem is..what goes in this corner?  I have no idea.  I am open for suggestions.  I am hoping it will come to me in the middle of the night (that's when my brain comes up with the best ideas) but for now, it holds the hodge podge of things undone. 

I think I am content with the rest of the room for now.  I am sure that as soon as I get the floor laid in the children's rooms and I mark some of the really important items off the to-do list, I will eventually get back to thinking about this room and what I want it to be.  Just not today.

Sunday, May 20, 2012

Kitchen Side Table Makeover

My sister-in-law was given this side table from her neighbors.  She didn't like the table at all, and quite frankly neither did I.  She couldn't redo the table because she would have to have it outside in the driveway to sand and paint it and if this sweet little elderly man that gave it to her saw her doing this, she was afraid he would get his feelings hurt. He thought the table was grand as is...

 Well, where do you think the tabe ended up?  In MY house.  Not that I am complaining; I never turn down free furnitutre - ugly or not.  I love doing furniture makeovers.  As I've said over and over again, it's amazing what a can of paint can do. 

My sister-in-law came over yesterday while the husbands were off playing at duck hunting camp.  We decided to tackle the table.  It's been sitting in the kitchen (in all it's shiny oak stained glory - ugh).  I put it there to sit for a few days while I stared at it and determined if that's where I wanted it to permanently be placed.  That's been a couple of months so I guess that's where it is supposed to stay. 

We sanded that shiny finish off and painted two coats of antigue white paint.  Then we distressed it by sanding around the edges and curves.  We gave it some new hardware and voila!  The new table...
I had already hung my plates and favorite rabbit picture above the table so refinishing the table really made the wall look complete. 
Not bad for FREE.  Now on to the next project!

Monday, May 14, 2012

Birthday Cupcakes, Duck Hunter Cupcakes, and a Crown Cake

We've had a lot of birthdays in our family over the last month.  Which means I've been doing some baking. 

My cousin's birthday was this past week and we had a joint party for her and my husband whose birthday is this coming week. 

For her, I made two tiered cupcakes with a candle made from a chocolate covered pretzel. 
For my duck hunting husband, I made cupcakes with camoflauge icing and a sugar cookie mallard on top.
My children call their grandmother Queenie (cute, right? they came up with that on their own...) so for her birthday, I made a crown fit for a Queen...
Just thought I'd share these with you...they were fun!

Chalkboard Platters

  I am on a mission to MAKE as many gifts as I can this year instead of buying them, so for birthdays, Christmas, etc. I have been collecting neat items from Goodwill and the antique store and then coming up with ways to repurpose them.

I found some really cool silver trays at Goodwill for a few bucks each.  
I decided to paint the middle of the platters with chalkboard paint and stand them up with picture frame stands.

First, I cleaned them - toothpaste is AMAZING.  It got all of the tarnish right off and made them pretty and shiny.
My little girl is an excellent helper :).  Next, I taped off aorund the edges and spray painted the middle with primer.  Then I painted three coats of chalkboard paint in the middle.
Here is the final product...I made one for me and one for my cousin for her birthday. 
Not bad for a few bucks, eh?

Monday, April 23, 2012

High Heel Shoe Cupcakes

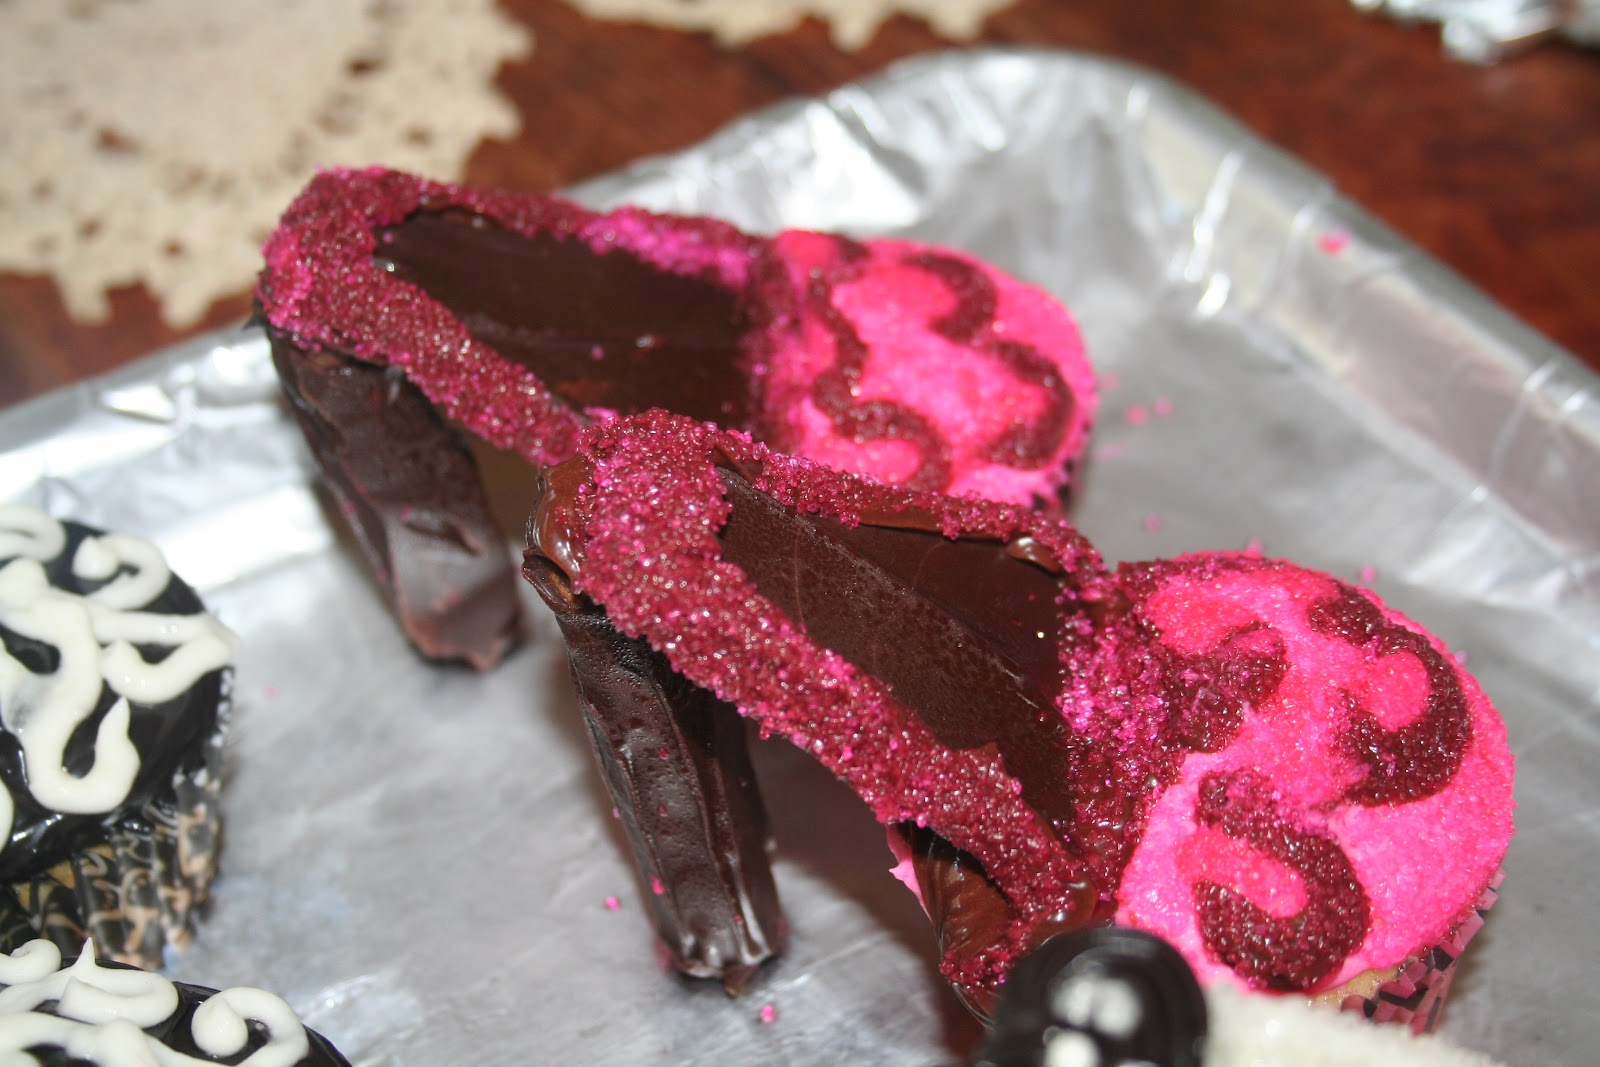
My sister's birthday was last weekend and I wanted to do something cute to surprise her.  I found an adorable idea for cupcakes that look like high heeled shoes in a cupcake book I recently got as a gift.  They were a little time consuming, as each pair had a different design (we can't have two pairs of the same shoes, now can we?).  Totally worth the time in the end because they turned out pretty awesome. 

There were 9 pairs in total.  The heel is made from those Pepperidge Farm pirouttes cookies and the flat part is a graham cracker coated in white chocolate.  Being the first time I did these, some are a little messy, but I figured out some things to do differently next time to keep them neater.
The Dorothy shoe...

The Spring Flower... (sorry for the blurry picture)
The wedding shoe...
The Green Bay Packer shoe (she loves Green Bay...)
This one has no theme or name...the black swirly shoe maybe?

The leopard print shoe...(the cupcake holder is pink leopard but you can't see it very well.  I should've taken better pictures!)  Lesson learned on this shoe - I dipped the heel in dark chocolate but quickly realized that at room temperature it kept trying to slide right out from under the rest of the shoe.  Next time I wont be dipping any heels. 

The zebra shoe, which kinda doesn't look like zebra print because I got the icing on too thick.  Lesson learned for next time...

The Zeta shoe (my sister was in Zeta and their color is turquoise).

And lastly, another shoe with no name.  This was my daughter Lilly's favorite.  The bow is made from a stick of gum :).
So there you have it...edible shoes.  Pretty cute, huh?

Saturday, April 21, 2012

Kitchen Cabinets

The kitchen cabinets needed an overhaul (as did every other thing in this house) and we didn't plan on replacing them so I had to figure out what to do to make them work for us.  Paint is magical.  Seriously.  I am always amazed at how just painting something can completely transform it and everything around it.  Painting kitchen cabinets is a long and painful process, but totally worth the time and effort when you see how they completely make the kitchen look new afterwards.  Here is the kitchen before:
Quite ugly, don't you agree? 

I sanded and sanded, which took several days.  Then I painted three coats of antique white on the top cabinets and the ones on the wall above.  I wanted to give the room a splash of color too since the walls and most of the cabinets would be antique white, so I used a country blue on the bottom cabinets around the breakfast bar. 

Three coats!  I painted and painted and was cussing these cabinets before I was done.  This is definitely a project you only tackle once every ten years or so because it is a lot of work and it takes a long time.  I had to paint three coats on each cabinet door, wait at least overnight, flip them, sand the edges (again!), and then paint three coats on the backs. 

After all of the painting, I sanded the edges of the doors and cabinets to give it an antigue finish.  Then I sealed them all with a coat of polyeurethane.  The poly gave them a yellowish tint, which I was upset about at first, but it's ok.  It adds to the antique feel.  Now that they are done I love them and it was totally worth the effort.  The kitchen doesn't look like the same kitchen at all.

Here they are - DONE!


I also hung my chalkboard up in the kitchen and am putting a quote on it each week.  The kids have really enjoyed this.
So there you have it.  What do you think of the cabinets?